Wednesday, June 29, 2011

Heartfelt Creations Wednesday!

Good morning!  Hopefully everyone is having a great week!  I know I'm so excited to have an extra long weekend with our Canada day on Friday and for all my American friends on Monday!  So today at Heartfelt Creations I shared a page that I created.  I really just wanted to make a fun page!  It is actually pretty clean and simple by my standards and it was so much fun to create.  Directions on how to create this page can be found on the Heartfelt Creations Blog so I'm just going to share a few close-ups here.


Here are the circles I really like the way the Martha Stewart marker added glitter and shine to this project.  I wish you could see this page in real life as the daisies have a really metalic gloss to them that is just way cool!


And the title and bee... I used my copic markers to die the letters, they were originally silver


and more flowers...


Well that is my project!  Thanks for taking a look!  Bee safe!  LOL!  Sorry it just had to bee said!  LOL!  I know now I'm just bee-ing silly!  Love bees don't you!!

Wednesday, June 22, 2011

It's Heartfelt Creations Wednesday!

I hope you are all enjoying hopping along on our shoe hop!  If you came here from Cheryl Walker's amazing blog then you are on the right track and this is the last blog before heading back to Heartfelt Creations. What an adventure this was... I had so much fun creating this shoe, I had no idea where to even start, thank goodness there are so many great tutorials out there.  I couldn't help but be inspired by all the creative designers who have taken the time to share there tutorials with the rest of us.  Well here is what I came up with.


Products used:

HCPC 3320 Vintage Word Background PreCut Set
HCPC 3403  Shabby Chic Lace PreCut Set
HCPC 3376 Distressed Leaves PreCut Set
HCD 701 Posy Patch Die

Other products

Basis light green cardstock
Bazzill Green cardstock
K & Company paper pad
Versa Mark
Zing gold embossing powder
Peeled Paint Distress Ink
Black lace
Zva pearls

The following shoe was done following the template for an elegant shoe that you can find here.  Cut out all the pieces for shoe out of Basis cardstock as directed, cut an extra sole out of pattern paper to cover the bottom of the shoe.  Cut down the sole template about ½’ around, use as a mask when stamping the word background on the sole with Versa Mark and gold embossing powder.  Cut out the new template out of pattern paper and attach to embossed sole.  Stamp the toe of the shoe with lace stamp and emboss in gold using same method as the sole.  Attach the heal and toe of the shoe and cover the bottom with pattern paper.  Cut out the 3 smallest sizes of posies twice using the paper pad to form the layers of the rose. Stamp leaves on bazzill with distress ink and cut them out.  Glue black lace on the toe as shown, add pearls and layer the roses and leaves to complete the shoe.

Decorating this shoe was so fun and easy with the wonderful stamps at HC... I know I say this alot but... these stamps are just so much fun to work with.  I really liked working with the Basis cardstock from Paper Temptress the weight is perfect for this kind of project, it really holds it's shape well. 

Here is a close up of the rose I created for the project.


I'm submitting my shoe to Diva's by Design Challenge Blog as they are hosting a anything but a card challenge right now!  They always have Gorgeous creations on there blog.
There is more!!

I also found some time to create a card this week that I am excited to share with you.  I love the way this card came out but to tell you the truth this card gave me a smidge of trouble... OK maybe more than a smidge but I completely love the way it turned out.  Here is the finished card before I go through all the fun I had.  I love trying out new techniques and on this card I tried a double resist.  It looks so easy when other people do it! LOL!


Ok so I stamped and embossed the sentiments that went well, then I added the distress ink then I dried it... I thought that when I embossed the second time it would be as easy as the first time well I almost cried when all the embossing powder stuck to the whole card, I took a paint brush thinking that I could just start over and was amazed when the powder came off the card and still stuck to the embossing ink.  Well as long as I was delicate.  That was the first almost disaster, the second... well I wanted just the edges of the image panel to be colored in Robin Egg ink but the pad was a little too dry and I got a smudge that I really did not like.  I thought I would cover it up using a little vintage photo but I went to far up the panel in some spots and severly disliked the original cover up.  I decided to take the vintage photo all the way up the image.  I went back over the edges with my blue distress ink because I could still see the smudge and well it was ok but now it was a little too dark!  I splashed some water on it to remove some of the ink and well the result of all these mistakes I LOVE... happy accidents... if you really hate the way something looks keep working at it and sometimes you come out of it loving the learning process as well as the finished project.

Well I hope you enjoyed my project as well as the rest of the Heartfelt creations design team please head on back to the HC blog and let us know what you thought of the hop... of the projects... of the stamps or anything else that you want to comment on!  We all love hearing what you guys have to say!  Well that is it for me Thanks for hoping along with us!

Friday, June 17, 2011

A project to share

Well I've been playing in my craft room and I had a chance to create a page just for me.  I love playing along in different challenges.  I find most of my inspiration comes from sketches and recipe challenges.  Here is the last LO that I did... OK so I actually did it last weekend... I just forgot to post it here... silly me.


This one was based on Sketch #160 from Creative Scrappers  I also used no pattern paper which was a requierement for one the the challenges over at Scrapbook Star, they are a canadian online scrapbook shop with a great board with awesome challenges and online crops.  The papers are from Kaiser Craft and the flowers are a mixture of Primas, and iamroses blooms.  I really like the way this page turned out.  This of course is my darling daughter Erica and one of our bunnies Flash. 

On a sad note... we lost a bunny this morning to a fox... sneaky fox managed to jump over the fence and knock off the board sitting over the bunny house to grab one of our beloved pets, Splash will definatly be missed.  My poor daughter was heartbroken... I am grateful that I got up in time to save the other 2 as the fox was back in the yard when I came out at 4 AM.  What a horrible heart wrenching day!

Here is to hoping your day was better than mine!  Thank heavens it is Friday!!

Wednesday, June 15, 2011

It's Hearfelt Creations Wednesday!

My favorite day of the week and I am so excited to share this project with you!  First though, OMGosh did everyone see the fabulous projects posted this week!  So much inspiration posted in one place... if you don't know what I'm talking about just check out all the GORGEOUS samples created by the DT team again this week.  I am just so impressed by all my team mates! 

I just LOVE how this chest turned out!  I had gotten this chest from Kaiser craft in a Swirlydoos kit a while back (months ago) and I was so excited to get it.  I got my box and though OK... it was flat and all in pieces, now I'm no carpenter so I was a little scared.  I started painting the pieces... dreaming of how it would look when it was completed.  I painted it, distressed it and pieced it together and that is it... that is how it sat for a few months... I knew I wanted this to be special but had no idea what I wanted to do with it.  I was looking through my cupboards last week and saw this unfinished project in my shelf (after being hit with a twinge of guilt) and it hit me!  I figured out how I was going to finish it and of course I knew it was meant to be a HC project!  Here is what I did...


The directions to put this chest together are on the HC blog... including a how-to for all the little handmade embellies on here!  Here are a few top views so that you can see how I finished up this project.


Well once again I truly hope you found a little inspiration in my project.  Please let me know if you have any questions or if you want any additional info on how this piece was put together!  

Wednesday, June 8, 2011

It's Heartfelt Wednesday!

It's hump day and I'm so glad it is a short week for me!  Yippee!  And to make it that much sweeter I get to share a page I created with a brand new Heartfelt Creations collection and are these ever PRETTY!!

The Heartfelt Wedding Collection features 7 new PreCut Sets and a new exclusive Heartfelt Creations die, manufactured by Spellbinders. With this collection, you will achieve lovely cards for all the weddings you are attending this summer. You are not limited to just wedding, you can create sweetheart, friend, and all occasion cards, especially with the new vintage lace die and stamp in this collection, the sky's the limit! We are delighted that some of the images in this collection coordinate with the recently released Bella Rose Die, adding even more value to a die you might own already. Leave a comment on my blog or the Heartfelt Creations blog by May 14 and one lucky person will win the entire release valued at $129.99. The winner will be announced on the HC blog on June 15.

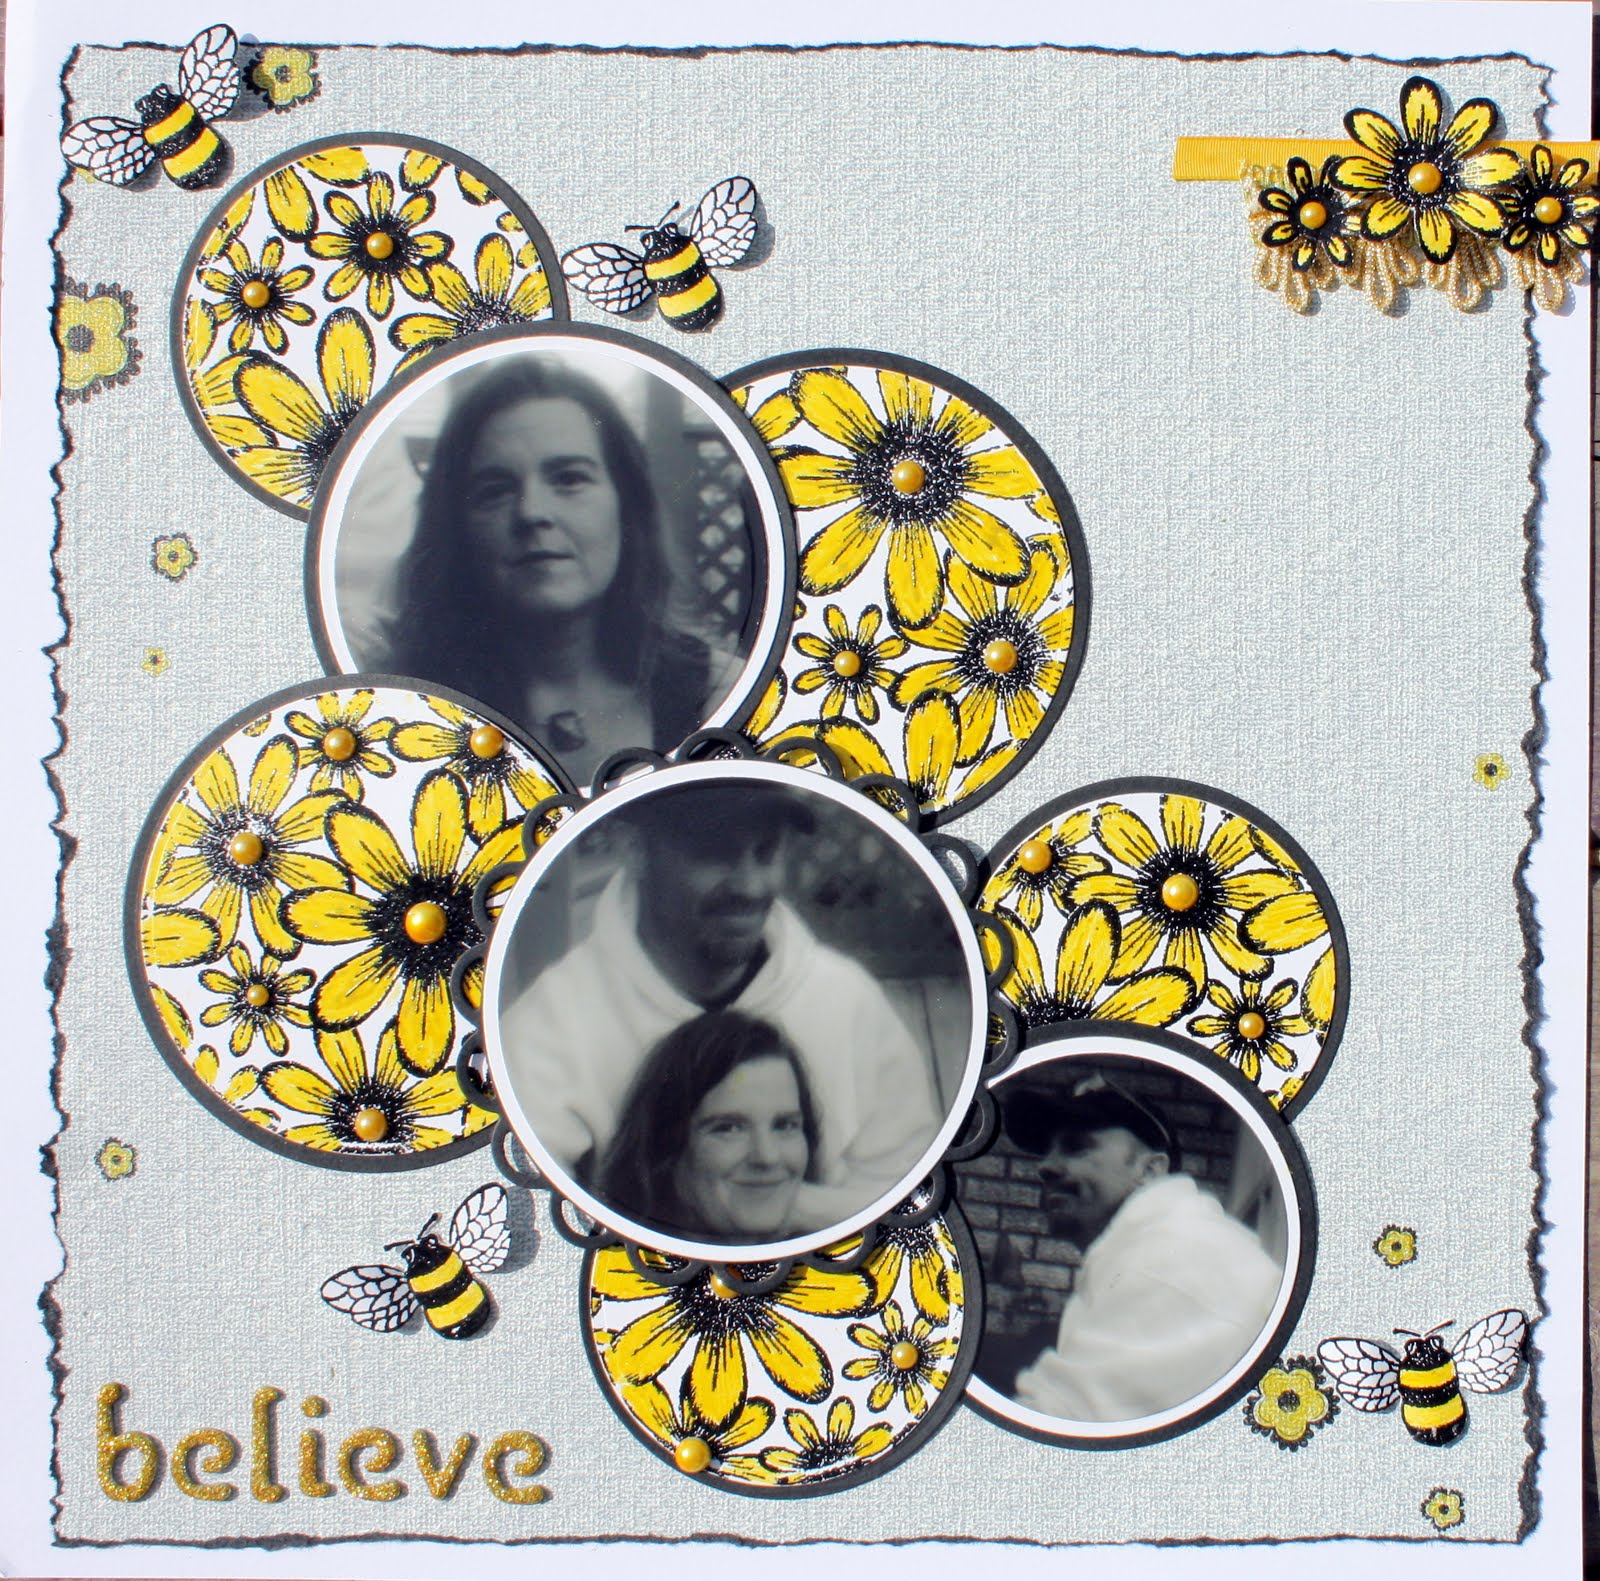
Here is the page I'm sharing this week!  This page came together so well... probably because it is based on a sketch by Rochelle Spears, her sketches are beyond fabulous!  I switched a few of the pictures up a little to accomodate what I had, the sketch called for 3 vertical pictures but I kept most of her elements!  Here is what I came up with.


These pictures where taken last week when we were heading out to a wedding.  I figured since we were all dressed up it was the perfect time to take a family photo... as you can see it isn't a very easy task to get a group of 3 looking happy and staring in the camera!  It took alot of shots to get to a usable picture so I decided to share 2 of the unusable ones as well!  LOL!  Of course this is me, my darling daughter and my sweet boyfriend!  The circle was punched using a corner punch and a technique that was shown by our very own Lisa Gregory, here is a link to the awesome video tutorial she made for the technique... I used a pan lid to draw and cut out my circle... nothing high tech here!  Here is a close up of the title block... unfortunatly I couldn't get it to photograph right but it turned out really pretty and shows up well in real life.


I filled in some of the blank space with a portion one of the bouquet stamp to get the little flower at the bottom, I colored  it with B00 which matched my ink perfectly!  I think this sentiment makes a perfect title!  Here is a closer look at the heart stamp that I colored in with copics... I glazed the flowers with stickles!  In my opinion every good page needs a little sparkle!

And of course no project ever seems complete without a flower cluster!  I love the look of the vellum mixed with the cardstock!  Such a pretty combo in my opinion!  The brads and the crystal swirls are also from HC!  I love that they carry all these little embellies to make each project extra special!


Here is where I am playing this week
Crafts and me for there Stamp something challenge as I have stamped alot of somethings on this page... flowers, leaves, lace, heart embelly, title sentiment, random patteren on cardstock... Definately somethingS! 

Scrap it forward.  There challenge right now is to scrap something that you are gratetful for... having George come into our family is something that I am truly grateful for... even if he drives me nuts from time to time... mabey even because he drives me nuts... serenity is highly overrated!... together we have a second chance at a family, check out there challenge and play along!

Fairytale Challenge is having a anything but a card challenge right now!  I just love the name of this challenge seems only fitting that I submit my fairytale family to a fairytale site... don't you think

Craft Your Passion is having an anything goes challenge (my favorite kind of challenge) well there is that catagory and my true favorite type of challenge is happening over at Diva's by Design - Florals!  I LOVE flowers use them on everything true challenge for me would be to make a page without flowers!

And last but NOT LEAST Make It Monday is having a link up party!  That is right you can link up any post that you want to share what a truly FABULOUS site!  I will be spending some time there for sure!  You should see that fabulous projects that have been linked up so far!!  GORGEOUS!

Well thanks for looking and here is to a short week!


Wednesday, June 1, 2011

Heartfelt Creations Wednesday

Good morning!  Today I get to share with you another page I did for Heartfelt Creations!  I know I say this every week but OMGosh what great samples on display again this week... If you haven't checked it out yet here is the Blog, check it out! 

Here is what I came up with this week.


The pictures were taken on our way to work... I drive 45 minutes into the bush each day to get to the mine where I work... Almost everyday we get to see wildlife on the way up... bears (including a cute cub munching on some leaves, wink!!), moose, foxes, lynx, birds, rabbits are always around.  I like to drive up and take pictures.  These pictures were actually taken by a co-worker though... he has a great telescopic lens on his camera!  My camera would never let me get this close to it!  I'm so grateful that he let me use these pictures!  

The exact steps to creating this layout are posted on the HFC blog but here are a few extra tips.  For the edges I used a water distressing technique that I learned at Swirlydoos, here is a link to that tutorial.  I also went a little misting nuts!  The more I use my mists the more I love them! 

I really wanted to share the title work with you!  It turned out really neat.  I started with plain chipboard alphas which I misted and then once it was dry I stamped the background stamp on the letters and heart embossed with gold!  I love the way it turned out.


Of course I carried through the gold embossing by stamping and heat embossing my flowers in gold as well.  Didn't they turn out pretty?


I misted these too and then heatset them and shaped them... that is the trick to making flowers in my opinion!  Wet them (mist or water)... crumple them... dry them (heat set) and shape them (random directions gives you a more realistic looking flower)!  With these steps the sky is the limit to the dimension you can achieve in your flowers!  I had tried to do these without the misting and well they layed flat I could curl them a bit but I couldn't get any height to them... this really makes a huge difference!

Well thanks for looking!  As always if there is anything that you want to know please don't hesitate to ask questions!