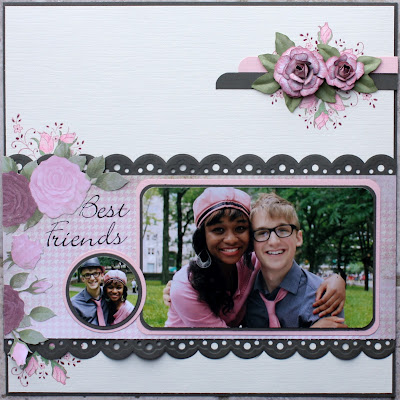
Good morning! Boy time is flying these days! I hardly noticed a whole week went by before I had a chance to blink! Well since today is Wedensday I get to share my latest project for Heartfelt Creations! As it happens Craft your passion challenge blog is having a Anything goes week so I am also submitting this page there. I love playing along with challenges around blog land! This week I chose to do a layout... I tried to keep it fairly simple as these photo's that Linda and Emma Lou sent me where so fabulous that I wanted a page that would complement the photo's and not overpower the page. Here is what I came up with.
For a simple page I did use alot of Heartfelt and Spellbinder products on this one, here is my supply list...
Heartfelt Creations Products:
HCPC 3406 Botanical Floral 1 PreCut Set
HCPC 3407 Botanical Floral 2 PreCut Set
HCPC 3405 Leaf Medley PreCut Set
HCPC 3400 Bella Rosebuds PreCut Set
123801 Classic Scallop Edgeabilities
472186 Rose Creations Shapeabilities
472123 Foliage Shapeabilities
354808 Standard Circle Small
354806 Standard Circle Large
Other Products:
Bazill cardstock – cream, grey and pink, Glitz and Kaiser Craft Pattern Paper, Distress Ink Victorian Velvet, Copic markers, Rub-on alphabet, Corner rounder punch.
A few tips to keep in mind... when using designer paper with a design in the corner, even if you don't plan on using it try to save it for use on a future project the fussy cut flowers were left over from another project. and they fit perfectly on this page. At least in my mind it works. Here are the rest of the instructions on how this page came together.
Directions: Trim a 1/2 inch on one top and side of the cream cardstock and layer on a 12x12 sheet of grey cardstock. Cut a 2nd strip of grey cardstock to about 6 inches and punch the Scallop Edgabilities die with insert on both sides. Cut a strip of pattern paper to fit inside and glue together. Fussy cut some flowers for a second sheet of paper and arrange along the edge of the strip on the one side. Once you have decided where the strip will be on the page stamp the Bella Rosebuds along the top and bottom of the fussy cut flowers with Victorian Velvet and color in with Copic markers. Glue the strip to the cardstock base. Round the corners of the main picture and mat using grey and pink cardstock, cut a smaller photo using the circle dies, alternating between the Standard small and large dies provides you with less of a gap between the layers. Add the photos and the rub-on title to the strip. Cut 2 small strips of pink and grey cardstock and round on corner and place as shown above the main strip. Stamp the rosebuds along the top and bottom and color with copics, Using the pattern paper from the strip, stamp and cut out starting from the smallest petal sizes cut out 2 small botanical flowers, 3 the next size up, 3 the next size up and 2 the next size up. Shape the petals to create the roses, stamp and punch 8 leaves and arrange around the flowers.
As always creating flowers is an essential part of any of my scapbook pages and although this one doesn't have as many as I usually fit on a page it doesn't make them any less stunning in my opinion. I just love making these roses, they are my go to flower more often then not!
Well that is it for me thanks for looking!


Your page is gorgeous, Joelle! I love the colors and beautiful flowers! Your design really showcases the photos!
ReplyDeleteYour roses are PERFECT! Really beautiful.
ReplyDeleteStunning! Love your roses! Well done!
ReplyDeleteBeautiful layout.The roses are stunning.Thanks for joining us at Craft Your Passion.Hope to see you again next week :D
ReplyDeleteLisa x
I saw your layout on Heartfelt Creation's Blog.
ReplyDeleteI just had to come here and let you know I think
you did an excellent job on the flowers. You get my
vote.
Such a pretty layout and your flowers are gorgeous!!
ReplyDelete